

How to Make an Epoxy Resin River Table or Cheese Board [Step-by-Step]

Follow our how-to guide to making an epoxy resin river table, including preparing the raw slab, building a mold, and coloring your river table with mica powder.
Epoxy resin river tables are one-of-a-kind creations that are equal parts beautiful and functional. This step-by-step river table tutorial will walk you through making a river table from start to finish.
Although a river tables seem like an intimidating epoxy project, the process is fairly simple, it requires a few simple woodworking tools, and there are just a few key steps:
Preparing the slab - Cut the slab to the desired length, split it down the middle, and prep the live edge. Prepping the mold - Create a mold using silicone caulk and plastic sheeting.Pouring the river - Pour epoxy resin (colored with mica powder) down the center.Finishing touches - Sand and polish, stain (optional), or pour a final coat of epoxy resin or poly sealer.
Need some help? We’ve provided step-by-step instructions below, for each part of the process. Use this guide to build your own river table, river charcuterie board, or epoxy cornhole boards.
Note: This river table project was made using our craft epoxy resin kit, which requires layering the epoxy in the river. See more below.
What Is a River Table?
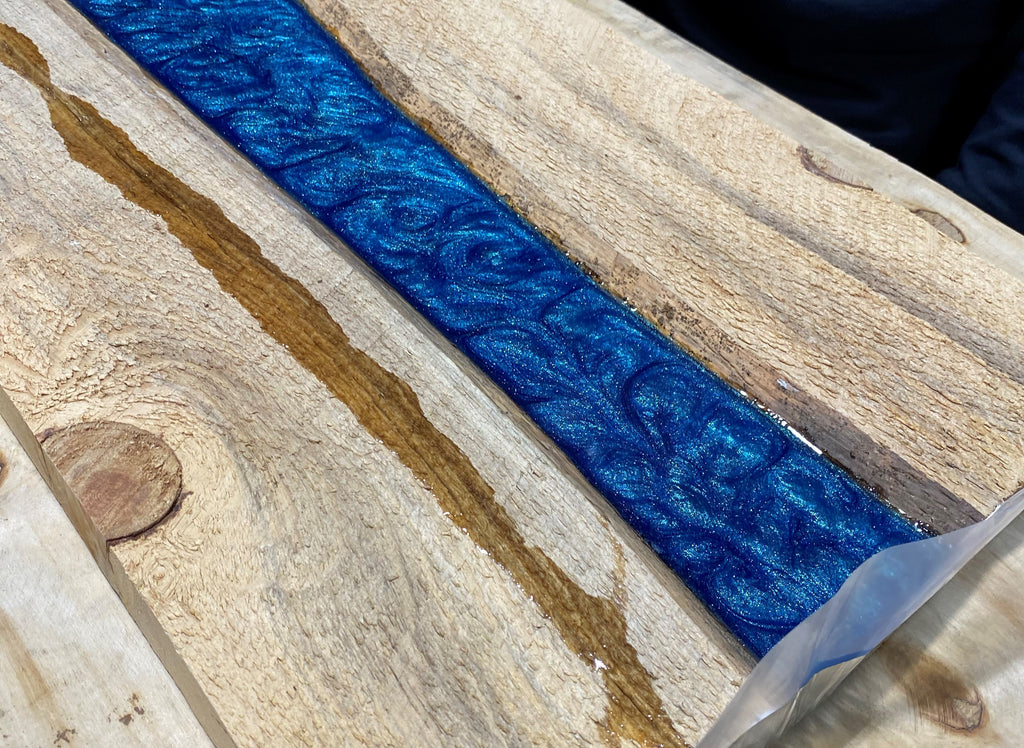
Epoxy resin river tables are made of raw wooden planks and epoxy resin. The slab is split lengthwise (“ripped”), and the live edges (with exposed bark and grain) are faced toward the center. A “river” of epoxy is then poured between the slabs to create a solid tabletop.
These tables can be very vibrant and colorful, and with techniques like swirling or using inlays in the epoxy, you can create some truly unique and incredible furniture.
One thing to note: The river table technique works great for a variety of projects. Many choose to start with a smaller project and work their way up to a large slab river table. Here are a few ideas for epoxy “river” projects:
- Charcuterie boards
- Cornhole boards
- Serving boards
- River end tables
Whether you’re looking to make a full-sized dining room table, or you want to make a round charcuterie board, the process is the same. Follow the steps below to make your own river project.
→ Find more epoxy resin inspiration in our guide: How to Use Mica Powder in Epoxy Resin.
How Much Resin Do I Need for a River Table?
You can get a quick estimate of how much epoxy resin you’ll need for a river table, by calculating the volume of the river. Take some quick measurements:
- Length - This is the final length of the table.
- Width - The width can vary. Try to approximate the average width.
- Depth - Measure the depth from the top of the surface to the bottom.
Once you have these measurements, multiply them together - LxWxH. This will give you the approximate volume of the river in cubic inches. There are 231 cubic inches in a gallon.
Example. A table with an epoxy resin river of 10.75 inches by 10.75 inches that was 2 inches deep, would require about 1 gallon of epoxy.
River Table DIY: Supplies List
If you already have a prepared slabs of wood, the supplies you’ll need to make a river table include:
- Orbital Palm Sander
- Silicone Caulk (Fast-drying Latex Caulk)
- Caulk Gun
- Metal Tape
- Plastic Sheeting
- Epoxy Resin Set
- Cups for Mixing
- Mixing Utensils
- Pigments
- Mask
- Gloves
- Polyurethane
If, however, you’re using a raw uncut piece of wood for the project, you’ll need a miter saw, a table saw, and a wire brush with stiff bristles.
Step-By-Step Instructions: Build Your Own River Table
This is a simple process for making your river table. Depending on the depth of the pour and the wood you are using (unprocessed wood adds more time), you can make a river table in as little as a couple of hours. Although, it can take 12-24 hours for the resin to fully cure.
Step 1: Prepare the Wood
Note: If you’re using prepared wood, you can skip to Step 2.
- Using a miter saw, cut your live edge slab of wood to your desired length.
- Use a table saw to rip the wood (with the grain)
- Use a wire brush to remove bark along the live edges.
One Tip. If you’d rather not prepare the wood, contact a local sawmill for pre-processed wood. A sawmill or woodworker might also be able to help you process wood, if you already have live slabs.
Step 2: Create the Mold
To create the mold, you’ll need a piece of thick plastic, caulk and metal tape.
- Lay a piece of thick plastic on your working surface. The plastic should be roughly 2 inches beyond the width of the intended river and extend roughly a few inches beyond the length of the wood on each end.
- On the bottom of each piece, use the silicone caulk (in a caulk gun) to line the length of the board with a steady string of silicone about an inch or two out from the river. Be sure to add a bit to the ends of the wood, too.
- Wait until the caulk fully dries. This will prevent blow-outs and resin from leaking out of the sides and along the bottom.
- Once done, flip each board over and lay the silicone side down on the plastic sheeting. Be sure to align each of the pieces with one another. The middle will be the river - the width is based on your preference.
- Be sure the plastic on the ends is flipped up to ensure no resin spills over. Then, reinforce the ends using a bit of metal tape.
How to Place the Wood. The live edge will have a natural taper. When placing the wood into the mold, the live edges will face inward (along the river), and they will naturally taper toward the center, creating a V shape. This creates a solid base for the river of epoxy.

Step 3: Prepare the Epoxy Resin
Before you pour epoxy, be sure to warm the material and mix in your choice of mica powder colors.
- Assume that your work space is a bit cooler than 75-80°, warm the resin and hardener bottles in hot water. We typically aim to heat in 100-degree water for 10 minutes prior to use.
- While that’s warming up, be sure that all pigments and mixing utensils are readily accessible as time is of the essence once the epoxy resin is mixed. Don your safety equipment - gloves and a mask.
- Once the resin is at the desired temperature, pour the 1:1 ratio of resin and hardener slowly into a reusable silicone cup.
- Using your mixing utensil, carefully stir until the resin and hardener for roughly 3 minutes or until fully mixed. Note that bubbles appear when you mix quickly. Bubbles are best avoided by warming up your epoxy resin, pouring slowly, and carefully mixing so as to not introduce bubbles.
- If using multiple colors, assign each color to its own cup, pour the mixed epoxy resin (slowly) and mix in the pigment.
Note: If bubbles are introduced, you can attempt to remove them once poured into your river by using a butane torch.
Step 4: Pour the River
One the epoxy has been thoroughly mixed (about 5 minutes of stirring on average), it will be ready to pour. Note: If you see white swirls in the mixture, it isn’t fully combined and needs additional stirring.
Next, pour the epoxy slowly to avoid introducing bubbles into the mixture.
- Once ready, slowly pour the initial layer. While tempting, be sure not to pour greater than 1/4 inch any given time. When working with multiple colors in that first layer, keep in mind that you’ll be adding additional epoxy resin and don’t want to maximize the first pour with a single color.
- Add in the additional colors using a stir stick, toothpick, or the like to create your desired design.
- First layer done? If there are any bubbles, you can remove them with a butane torch taking care not to touch the flame to the epoxy resin but rather just enough to add heat and release the bubbles.
- Wait until the initial layer is gelled up before adding subsequent layers. This takes about 24 hours.
- Then, repeat this process until the river is full.
Note: These directions are for our epoxy resin kits, which have a maximum pour depth of ¼ to ⅓ inch.
Step 5: Finishing Touches
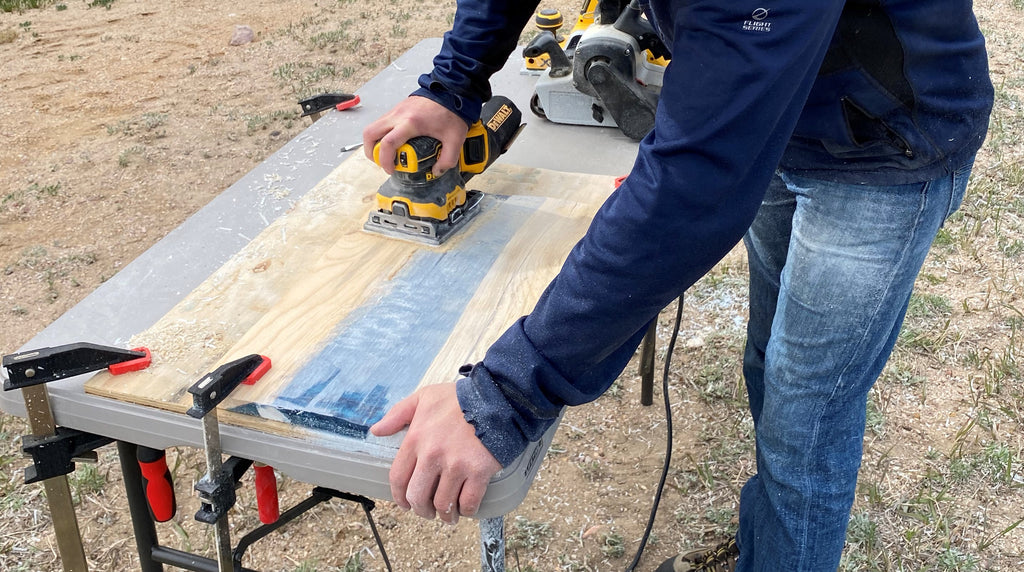
Final steps include sanding and adding a clear coat.
- Once fully cured and ready for finish, remove the plastic, silicone caulk, and metal tape.
- Take an orbital palm sander to the wood to make the epoxy flush with the table and take out any impurities.
- Then, add a coat of polyurethane to the entire piece.
Optional step. You can use a planer for smaller projects, which will trim the finished board to a uniform thickness. If using a planer, you can finish with a palm sander.
More Epoxy Resin Project Resources
Slice of the Moon has everything you need to make incredible river tables. Choose us for:
And be sure to check out our other epoxy and mica tutorials, including Resin Turning 101 and our guide to using mica in epoxy resin.
Shop Slice of the Moon Products:
Shop our Amazon.com Storefront or Contact Us for Bulk Orders